How to flash documents correctly: detailed diagrams with descriptions
There are several options for how to properly stitch documents with thread or a special cord. The choice of the appropriate method depends on the type and size of the documents, their orientation (landscape or portrait), as well as the requirements of the institution to which the book will be provided for reporting.
How to stitch an incoming documentation journal and the rules applied in stitching more important and valuable documents are approximately the same. The only differences are in the number of holes, the order in which the cord is threaded through them, and the numbering of the book. It is easier to sew documents in 2 holes than in 4 or 5. You can also sew documents “on the corner”, but this method is not used often and is not suitable for creating books stored in the archive.
In two holes
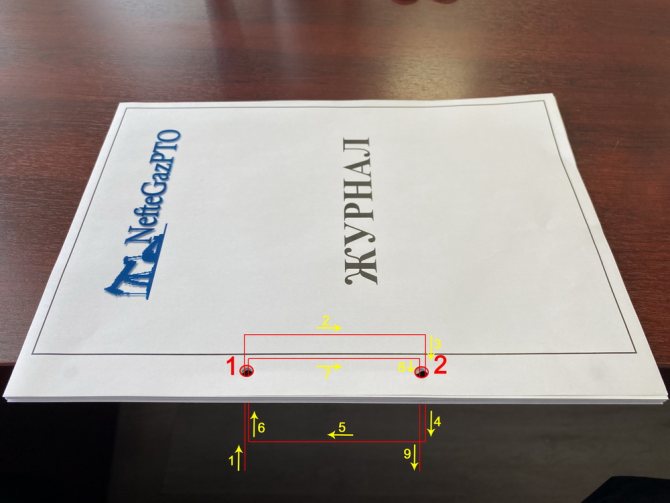
The easiest way to stitch documents is with a special cord or thread into two holes. This method is suitable for different types of papers, which will subsequently be submitted for verification or as a report, or stored in the archive. Firmware in two holes is carried out using the following method:
- Take all the documents you plan to sew together.
- Place the sheets in the correct order. Typically the date of the document is used as a guide.
- To make holes you need to use a hole punch, the extreme tools are an awl and a drill.
- Set the limiter on the hole punch to the “A4” mode, or set another required size.
- Insert the paper tightly into the hole punch (as in photo #2 above).
- Make sure the stack of documents is aligned so that they lie level against each other.
- Carefully, holding the documents, make a hole in the stack.
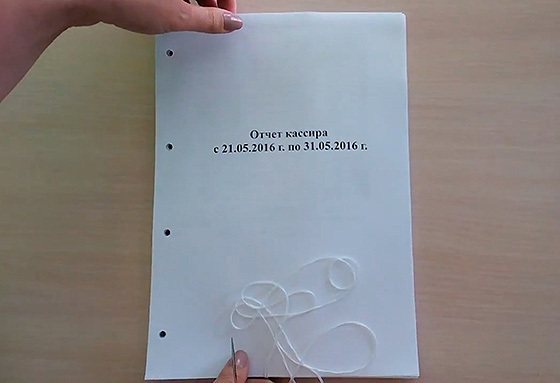
- In accordance with photos No. 5-No. 8, sew the documents with thread.
- Cut the thread along the opposite edge, approximately 20 centimeters (photo No. 9).
- Tie both ends of the thread into 2 knots. The thread located between the two holes should not be too tight. Otherwise, the documents will be jammed and will not open completely. (photo No. 11)
- Prepare a form for the sticker (photo No. 12). You can download the form “Stitched, numbered and sealed” from the link at the end of the article.
- Make an additional knot. It should be located strictly under the sticker (photo No. 13-14).
- Number the documents to be stapled (photo No. 15).
- Apply paper glue to the entire back side of the sticker. Glue in such a way that the thread is between the documents and the sticker. Place the ends of the thread in different directions. Use your fingers to press down the entire area of the sticker, especially pressing on the thread. (photo No. 16).
- Fill out the binding form. Place the stamp so that it is on the sticker and on the documents.
Three holes
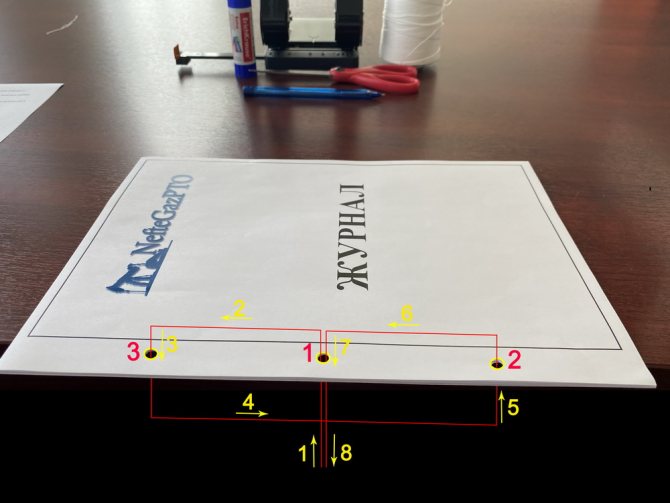
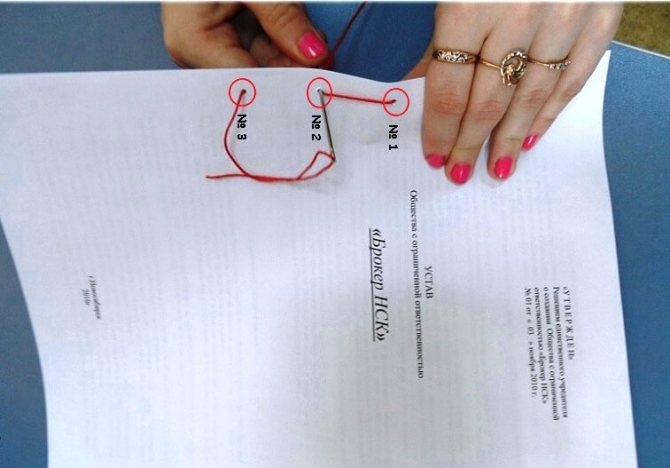
Another question is how to sew documents into 3 holes, because the pattern of holes and thread placement here is somewhat more complicated. First, select the documents that need to be stitched together. They are placed in the correct order in an even stack.
After these steps, you must perform the following manipulations:
- Install a limiter on the hole punch so that the distance to the center of the outermost piercing element is 68 mm (photo No. 1)
- Insert the paper tightly into the hole punch (photo No. 2).
- Make sure the stack of documents is aligned so that they lie level against each other.
- Carefully, holding the documents, make a hole in the stack (photo No. 3-4).
- Turn the documents over and repeat steps 2-4 (photo No. 5-7).
- In accordance with photos No. 9-No. 12, sew the documents with thread.
- Cut the thread along the opposite edge, approximately 14 centimeters (photo No. 13).
- Tie both ends of the thread into 2 knots. The thread located between the three holes should not be too tight. Otherwise, documents will not open well (photo No. 14)
- Make an additional knot. The node should be located under the sticker (photo No. 15).
- Prepare a form for the sticker. Approximately 3x5 cm. You can download the form “Stitched, numbered and sealed” using the link at the end of the article.
- Number the documents.
- Apply paper glue to the entire back side of the sticker. Glue in such a way that the thread is between the documents and the sticker. Place the ends of the thread in different directions. Use your fingers to press down the entire area of the sticker, especially pressing on the thread. Fill out the binding form. Place the stamp so that it is on the sticker and on the documents (photo No. 16).
Four holes (2 ways)
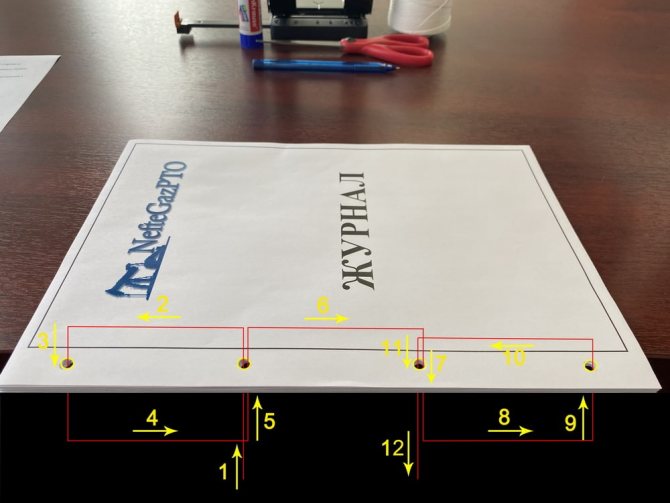
There is another option that is used quite often. This is a four-hole documentation firmware. It is somewhat more complicated, but it is carried out in approximately the same way as in two holes. The sequence of actions in this case is as follows:
- Set the limiter on the hole punch to a special mode for 4 holes, as in photo No. 1. This mode can be indicated by four dots, 4HOLE, or 888.
- Insert the paper tightly into the hole punch (photo No. 2)
- Make sure the documents are aligned with each other.
- Carefully, holding the documents, make a hole in the stack. (photo No. 2-4)
- Turn the documents over and repeat steps 2-4 (photo No. 5-7).
- In accordance with photos No. 9-No. 14, sew the documents with thread.
- Cut the thread along the opposite edge, approximately 20 centimeters (photo No. 15).
- Tie both ends of the thread into 2 knots. The thread located between the four holes should not be too tight. Otherwise, documents will not open completely. (photo No. 16)
- Make an additional knot. It should be under the sticker (photo No. 17).
- Prepare a form for the sticker. Approximately 3x5 cm. You can download the form from the link at the end of the article.
- Number the documents.
- Apply paper glue to the entire back side of the sticker. Glue in such a way that the thread is between the documents and the sticker. Place the ends of the thread in different directions. Use your fingers to press down the entire area of the sticker, especially pressing on the thread. Fill out the binding form. Place the stamp so that it is on the sticker and on the documents (photo No. 18).
Second method (video):
Five holes
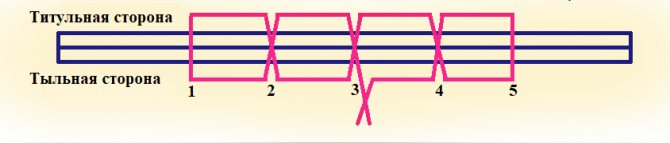
Stitching documentation with 5 holes is used very rarely. Usually they resort to it when the book has a non-standard size or the documents placed in it are very important and require strict reporting and special storage.
The stitching scheme here is approximately the same as in other methods. The main thing is to maintain consistency in threading the thread through the holes. Usually the following standard option is used: the thread is threaded one by one through the holes in the following order: 3-2-1-2-3-4-5-4-3. Then both ends of the thread should be brought out from the back of the book. Tie a knot and leave 7 cm at each end of the thread. Paste a piece of paper or a sheet of firmware and sign it.
Legal Aid Center
Video - how to file files correctly: Filing documentation in some areas of business is regulated by separate regulations of the organizations responsible for the area. Thus, firmware in the banking sector is regulated by the Instruction of the Central Bank of the Russian Federation “On office work in the Central Bank of the Russian Federation.”
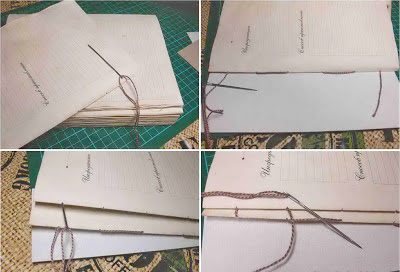
- Then we thread the thread again in the same way as in the first step.
- Next - from the front side to the next hole
- In the extreme puncture on the back side
- From the front side of the hole that we passed in the fourth step
- And connect the ends of the thread
- At the same time, we try to pull the thread so that it tightly compresses the sheets of documents
- All that remains is to tie the thread in a knot
- Trim excess length of thread ends
Regulatory regulation of document firmware in office work
The requirements for transferring documentation to the archive and submitting reports to the relevant government services differ from each other. Therefore, before completing the firmware, you need to familiarize yourself with them. If necessary, you can contact the institution by phone, look at the information on the website or in special books, and update the documentation in accordance with this data.
Special requirements are imposed on filing documents for the tax service and courts, accounting reports and personnel documentation. Let's figure out how to file documents correctly, consider all possible methods.
Documents to be flashed
Most of the documents in various public and private organizations are subject to firmware. After stitching, they are transferred to the archive and submitted to a bank or tax office for reporting. Firmware may also be required when submitting reports to various non-budgetary organizations, for example, foundations. In any case, the documents will need to be not only stitched, but also numbered, and the resulting book properly formatted.
But not every paper needs to be filed and stored. The following types of documents are subject to firmware:
- personal and general orders;
- staffing schedule;
- personnel and archival documents;
- accounting documents, including statements, reports, invoices, checks, travel sheets, acts of work performed, cash books;
- incoming and outgoing documentation;
- recipes, price lists and other types of documents;
- tender documentation;
- all papers submitted for verification.
Documents are filed so that they are not replaced, lost, or damaged. At any time, you can go to the archives and find the paper you need if you know exactly what you are looking for and the approximate time of its registration.
Regulatory acts governing the binding of documents
The main document regulating the rules for stitching documents in Russia are the regulations of the Federal Archive, established by Order No. 76 dated December 23, 2009. The rules are also spelled out in other regulations:
- order of the Federal Tax Service dated January 25, 2012 under number No. ММВ-7-6/25, where the mandatory firmware of documents submitted for reporting was cancelled, although many services today prefer to accept firmware rather than separate sheets;
- GOST R 51141-98 “Office work and archiving”, which regulates many aspects of office work;
- Order of the Ministry of the Russian Federation for Taxes and Duties, issued on April 18, 2003 under number No. BG-3-09/198 “On methodological explanations on the procedure for filling out certain forms of documents used for state registration of a legal entity”;
- instructions of the Central Bank of Russia - order dated December 7, 1992 N 02-213 “On approval of the Instructions for office work in the Central Bank of the Russian Federation” as amended as of September 15, 1997.
In addition, the firmware of documents depends on the area to which they belong. Incoming and outgoing documentation is filed completely differently than tax reports or paperwork from the accounting department. Therefore, each area has its own rules and documents indicating how to correctly and what exactly needs to be stitched, submitted for reporting and deposited in the archive.
Regulatory acts regulating the filing of documents
Making holes
At the legislative level, standards for stitching documentation by each company structure are not defined, but there are general rules for stitching sheets together. Order of the Federal Archive “Office work and archiving” No. 76, order of the Ministry of Culture No. 536 have recommendations on how documents are bound together, standard instructions for office work.
Decree of the Government of the Russian Federation No. 439 has a general theory of why this is needed and how this happens, however, the law of the Russian Federation “On Archiving” describes only the obligation of all organizations to preserve documentation, but the law does not indicate how this should be done. Order No. 02 - 213 “On office work in the Central Bank” also describes the standards for storing documents in archives in all banks.
Option for binding documents according to GOST
Necessary materials for stitching documents with threads
In order for the flashing of documents to proceed correctly and not take too much time, it is necessary to prepare in advance everything that may be useful in the process. To stitch documents of different sizes and types manually, you will need to prepare the following materials and tools:
- needles of the required size. It is better to choose thick, sharp and most durable options (not needed when using a hole punch);
- PVA glue or any other suitable for gluing papers;
- an anti-stapler that will help remove all staples from documents before stapling;
- book cover (if necessary);
- certification sheet or 3x5 rectangle of plain white thick paper;
- scissors;
- paper clips to help secure the stack while stitching;
- thread, twine or ribbon of any color;
- a hole punch, awl, or drill which is useful for making holes in a large stack of papers.
When sewing, a regular needle may not withstand the load and break, so it is better to choose a needle with a thick eye. Holes are not always made with an awl, a hole punch or a needle. Some office workers use a screwdriver or drill for this. And in large organizations, special machines are often used for firmware.
Practical tips that will help you accurately and correctly stitch a notebook with threads
For convenience, use some useful tips.
- Choose thick paper to prevent damage.
- You can use nylon or regular thread, but bent in two layers.
- Remove all unnecessary elements from the sheets: paper clips, clips...
- For the cover, use thick cardboard.
- Sort everything by date.
- Numbering is carried out first from 1 in ascending order, except for the inventory.
- Corrections are permissible, but only in accordance with the instructions and with the certification of new data.
Did you like it?
Loading…
Found a mistake? Select it and press Ctrl + Enter. We'll fix everything!
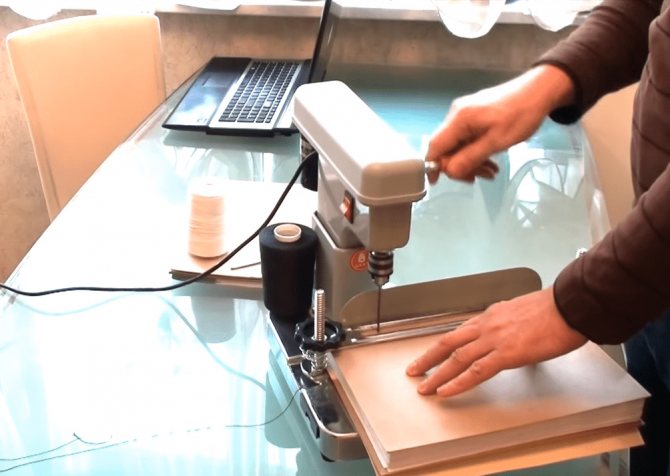
Document stapler, purpose
A stapler is a special machine that helps to stitch a large number of papers in the shortest possible time. Stapling documents with this machine is an effective way to simultaneously punch holes and staple together stacks of papers of different sizes up to 1000 sheets.
Each enterprise independently purchases such a stapler for its needs, selecting a model that is suitable for price and functionality. Both domestic and foreign models are popular. Their cost varies, but on average no less than 7-10 thousand rubles. Higher quality copies can be purchased for 30-50 thousand rubles.
Preparing documents for firmware
Preparing documents for stapling is an important step. It determines how fast, high-quality and correct the stitching will be. The preparation process takes place in several stages:
- Selecting and designing a cover for a book. Most often they choose the standard one, which is suitable for all A4 documents. Usually, light-colored cardboard is used for it. There is also a non-standard cover, used if documents have an unusual size, for example, A5 format. There are covers designed for long-term storage. They differ from the standard ones in greater density and wear resistance.
- Complete set of the book. Before stapling, a set of documents is prepared. One book contains only one type of documentation. For example, a book of incoming correspondence or personnel orders. Moreover, the pack should contain no more than 250 sheets. If you need to sew more documents, you will have to divide them into several volumes.
- Preparation of the papers themselves. All staples, paper clips, and pins must be removed from them. The stack is placed in the correct order: from earliest to latest.
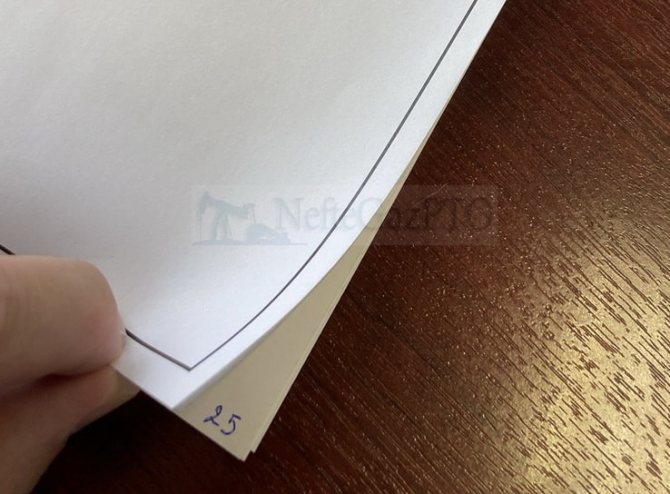
- Numbering of sheets. Usually it is done with a simple pencil. But in some organizations, numbering is done with a pen. The number is placed in the upper corner of each document in Arabic numerals. If necessary, Russian letters can be used, for example, 15 a, 15 b, etc. Page numbers must be entered so as not to affect the text of the document. The inventory and some annexes are not numbered. There is no number on the title page, and the second page immediately comes with the number “2”.
- Inventory of papers. Each filed document must have a filing date and storage period, a detailed annotation, an indication of the organization and name of the paper. The book must also contain an inventory, the number of papers and pages, a signature indicating the full name. clerk who did the stitching.
Basic ways to flash documents
You can stitch documentation in a variety of ways. How to staple documents in your case depends on the requirements and rules of the company itself, legislation, type of papers, available equipment and materials. Here are some of the most common options for preparing documentation for archiving or reporting:
- Classic stitching method. Usually you need to stitch documents in 3 or 4 holes. This method is suitable for all types of papers, regardless of their format and volume. Thread, twine, rope or ribbon are tied at the back of the book with a knot, and a certification inscription is pasted on top.
- Bulk materials are held together using a thick rope threaded into holes previously made with a hole punch or screwdriver.
- Binding machine or stapler. This method is used in large enterprises.
Some companies turn to a printing house to have their documentation bound. This facilitates the process of preparing documents for filing in the archives, but can be an expensive service if there are a lot of papers.
Document binding process
Today there are no clear regulations on exactly how to stitch certain types of papers. Each organization may have its own rules and patterns. Please clarify this point if you do not know how to staple documents or have recently taken a job as a clerk. It is better to find out in advance how and what was done before you, look at the documents already archived, ask the manager or the official previously responsible for stitching, than to make mistakes.
The documentation binding process consists of several stages:
- Preparation. All necessary materials and tools are purchased in advance. Documents are selected and reviewed. They are folded in the correct order, and the metal inserts are removed.
- The stitching process itself. Holes for the thread are being prepared. To do this, use a needle, hole punch or other tools. A thread or rope is inserted in the correct sequence into the holes and tied with a knot on the back of the volume. The thread is then cut and the ends are left free. A special form or paper is glued to the top, where a signature is placed and the number of pages and documents, the date, and the name of the responsible person are written down.
Then the documentation is submitted for verification or archived. Some types of documents are stored where they were made, and not in an archive. For example, some types of accounting papers, incoming and outgoing documentation. This is due to the fact that they are often accessed during work.
How to staple documents with 5 holes
- Thus, HR employees must flash:
- orders of personal and general personnel,
- as well as staffing.
- Accountants perform the specified procedure with:
- advance reports,
- invoices,
- invoices,
- waybills,
- cash books,
- turnover statements,
- acts of work execution,
- as well as wage slips, if they are issued in person.
We recommend reading: Documents for changing a passport after marriage
Multi-page documents cannot be pasted. But how do you sew them together? After all, incorrect firmware can result, at a minimum, in a refusal to register an authority requiring you to provide a package of documents.
- What to do if there is no set of rules and samples, and it is impossible to stitch papers as it turns out, and not as it should be. Despite the fact that there are no clear instructions regarding the binding of documentation, it is necessary to focus on the specific requirements of the authority that requests information in the form of a bound package of documents.
- It will also be useful to familiarize yourself with general recommendations for flashing documents that consist of more than one sheet.
Sample how to stitch and number a magazine
Particular attention should be paid to how to stitch and number the magazines. This is an important type of documentation that is used frequently. There are no strict regulations here, as in the stitching of other papers. But there are a few basic rules:
- All documents are numbered. The magazine is no exception. Even if it already has a number, it is numbered again. After all, during the work process, errors may be discovered and changes may be made.
- The magazine is always stitched with a thick, strong thread in the same way as other documents - along the left edge with the same distance between the holes.
- The stitching process uses a durable binding designed for long-term storage.
- Usually the magazine is stitched in 2 holes, but there may be other options.
- The thread should be slightly loosened, unlike when stitching other documents. Otherwise, when opening the magazine, the pages may tear or the book will be difficult to open completely. And this will prevent you from making a high-quality scan or photocopier, which is necessary for a report or further work with information.
- Like other bound books, the magazine must be sealed at the back with a “control”, on which there will be a signature, number, full name. responsible person and number of pages, printing.
Stapling documents for the tax service
The Tax Service gives clear recommendations on how to stitch together files and papers that are submitted for verification and reporting:
- The number of sheets in 1 volume is up to 150 pieces.
- The book contains originals and photocopies of documents, most of which must be certified.
- Filing must be done in such a way that no stamp, signature, visa, or date is inaccessible. Moreover, such documents are often scanned and copied, which should be taken into account when filing. If it is made too tightly or close to the text of the document, a person will have to break the firmware in order to get a high-quality copy of the document, and this is very inconvenient.
- Numbering is carried out from the first sheet.
- The stitching method is chosen independently. But stitching in 2, 3 and 4 holes is usually used.
Just as in other books, the ends of the thread, after stitching, are brought to the back of the volume and tied with a knot. A piece of paper or a certification form is glued on top, a signature is made and a seal is affixed.
Making corrections
If documents are stapled by an employee for the first time, errors in the process are possible. Almost all of them can be corrected. The most common mistakes that occur are:
- Some documents have been forgotten. Sometimes, when the entire binder has already been stapled, a missing part of the sheets is discovered. There are two possible fixes. A new volume is formed from the remaining documents and stitched separately, or the firmware is re-installed. Simply taking and adding the missing sheets to the stitched folder will not work.
- Numbering errors. In the same way, there are 2 options for solving the problem. If the same number is entered twice, then a letter prefix is assigned to the double, for example, 24, 25, 25a, 26, etc. If, on the contrary, one of the numbers is missing, then the erroneously entered numbers can be crossed out and rewritten. If the total number of sheets (pages) on the label is incorrect, it should be corrected.
The main purpose of the firmware is to ensure document security - that is, to eliminate the possibility of replacing, forgery, or adding documents to a folder.
Depending on the requirements of office work, documentation can be stitched using various methods - in 2, 3, 4 holes or in an angular way. The stitched documents are numbered and the stitching unit is sealed using paper and glue. The sticker is certified by a signature and seal, and is also provided with an indication of the total number of sheets (pages) in the binder, the date and other information as necessary.
Firmware for large volumes of documents
If a large volume of papers is required to be stapled, the clerk simplifies the process using a drill, stapler or other equipment. Large enterprises hire a special employee who works 1-2 days a week and files different types of papers for all departments of the organization.
It is important to remember that everything must be done on time. Papers must be stapled as they accumulate, so as not to have to work with large volumes of documents later. But even when completing tasks on time, sometimes you have to think through options on how to stitch documents with a needle and thread quickly, efficiently and in large quantities.
The difficulty comes from thick stacks of papers that need to be stapled. The stitching principle here will be the same as described above. If a stack of papers has a volume of up to 250 sheets, then the insertion is carried out in one book. The only exception is documents for the tax service. Here the volume cannot contain more than 150 sheets.
If there are more than 250 sheets of documents, then they are all divided into several volumes. The cover must indicate the type of documentation, for example, “Incoming documents,” as well as the volume number and the year that the papers included in it are dated.
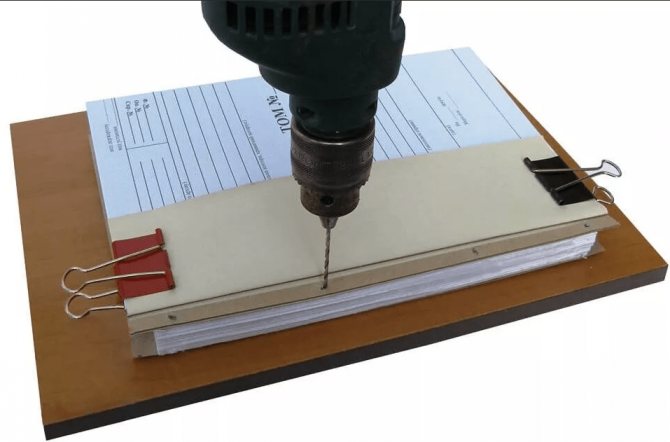
The easiest and cheapest way:
- Take a drill with a long drill bit.
- Place the aligned documents between two boards.
- Press the documents with clamps or, if the volume is very large, with your knee.
- Drill holes keeping the drill in a vertical position.
- Without changing the position of the documents, remove the top plate.
- Using a long needle or an unfolded paperclip, stitch the documents several times.
What standards apply?
It is necessary to staple working papers to organize them. Companies and institutions stitch together the documentation that needs to be transferred to the archive. It is convenient to store bound papers and submit them to inspection authorities upon request without worrying about their safety or the possibility of substitution.
There are certain regulatory guidelines governing how to correctly flash documents according to GOST in 2021:
- Methodological recommendations approved by Orders of Rosarkhiv No. 76 of December 23, 2009, No. 44 of April 11, 2018, No. 71 of May 22, 2019.
- GOST R 7.0.8-2013.
- Rules for office work developed by industry departments (Central Bank of the Russian Federation, Ministry of Finance, Ministry of Economic Development, etc.).
Features of document firmware: nuances
How to file documents depends on their format, scope, purpose of filing and the enterprise itself. But there are basic rules that work in all cases:
- The volume in a volume cannot exceed 250 pages. If there are only 20-30 pages left for the last volume, then you can make the previous volume thinner by placing the documents before stitching from it into a thin book so that it looks aesthetically pleasing.
- All sheets of the volume are numbered. The case inventory is not subject to numbering. If there is an error in the numbering, the incorrect number is crossed out rather than covered up with a proofreader. Then the new number and the signature of the responsible person are placed next to it.
- If the filed sheet is too large, for example, A3 format, and all documents are A4 format, then the sheet is folded during filing so that it does not protrude from the general stack of documents, but can be freely unfolded for review and copying.
- The holes are always made symmetrical, located 1.5-2 cm from the left edge of the document.
If one document consists of several gluings, then when numbering one number is placed on it, and the number of sheets is indicated in the inventory.
How to number sheets
A special form is always glued to the back of any book or magazine, on which it will be written when it has been stitched and numbered by the clerk, signed and stamped. Usually the numbering itself does not cause difficulties. The main thing is to remember some details:
- Only Arabic numbers are used;
- the use of Russian letters is allowed;
- The sheet number is written so as not to affect the text;
- the number is usually indicated at the bottom in the middle or closer to the edge farthest from the binding, but some organizations have different rules;
- if there is no space on the sheet, numbering on the back of the document is allowed;
- if a letter that arrived in an envelope is filed in a folder, the envelope is numbered first, and then its contents;
- when appendices to cases represent a large volume of documents, they are packaged in a separate volume and numbered separately;
- if there are several volumes in a case, then each volume will have its own numbering;
- checks and other attachments are not numbered, but are only indicated in the inventory.
Double-sided documents in a folder are numbered only on one side, namely the front. And when numbering applications, a continuous system is used, in which the document number corresponds to the application number, but differs from it by the presence of a letter. For example, the document itself is No. 34, then the appendix to it is indicated as No. 34 a. Such a system helps those viewing the documentation quickly find the required paper, as well as maintain the integrity of the information.
Standards for government agencies
The standards required for documents submitted to government agencies do not coincide with the standards required for archival storage or internal documentation.
The rules for submitting documents to judicial or tax authorities provide:
- flashing using the 3-hole method;
- hole puncture distance is no more than 30 mm;
- the stitching is made with thread or thin cord;
- the thread is sealed on the last page of the binder with a piece of paper 30x50 mm, certified by signature and seal.
Important
When submitting reporting documentation to the accounting department, the firmware unit must be sealed with tissue paper. This requirement is mandatory.
Label example: what to include
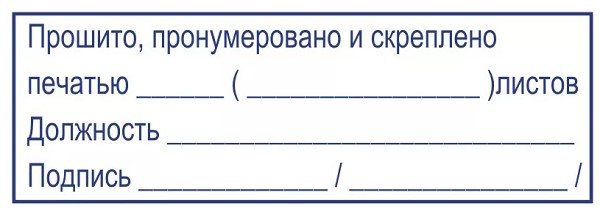
Stickers of a certain type are necessary in order to secure the thread and put a “seal” on the volume of bound documents. They contain all the necessary information about the book, including the number of sheets and the signature of the person in charge. You can use these stickers in Word format or write them yourself on a blank sheet of paper, “stitched and numbered.” Both options are suitable for all types of documentation, but the first one (with ready-made stickers) is more often used.
If you cut out a sheet of paper yourself, it must be of a certain pattern. The paper must be clean, white, and 60 mm by 40 mm in shape. But you can cut stickers in other sizes. The main thing is that they contain all the necessary information.
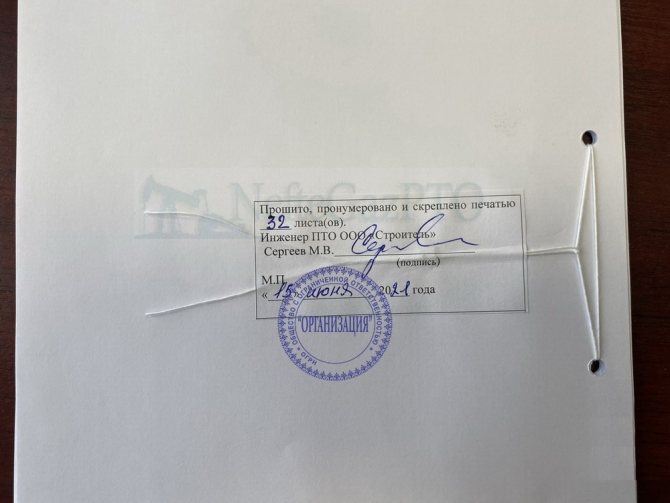
When gluing, the stitching knot is removed under the paper. You can use different types of glue, but most often a glue stick is used, which dries quickly and does not allow the printing ink and paste to smudge. Such a sticker must have the inscription “Numbered, laced and sealed with N sheets.” You also need to leave space for your signature and full name. responsible person. The sticker must have a seal, the imprint of which must partially appear on the book itself and on the sticker.
How to tape a document to the back
After stitching, all types of documentation are sealed on the back with a special sticker, which we discussed above. It indicates when the case was stitched and numbered, certified by a seal. This is one of the important stages of firmware.
Don't look at how simple it is. In fact, this is a big responsibility and it is this stage that is important in preparing documents for filing in the archive and for reporting to the relevant services. The sticker or form that you place on the back of the book is a seal that indicates the integrity of the volume, that no one has added sheets to it or taken away documents. This is what a sticker on a volume with any documentation usually looks like.
Basic concepts and tools required for flashing
Guided by the above regulations, we will consider one of the final stages of document preparation, namely their firmware.
Basic, i.e. such that are used when flashing all types of documents are the following principles:
- mandatory gross page numbering, which, as a rule, is carried out in Arabic numerals in the upper right corner of each sheet of the document (clause 6.2.2.4 of the Instruction of the Central Bank of Russia No. 9 of December 7, 1992);
— all documents that consist of two or more sheets are subject to firmware;
— copies of statutory documents should also be flashed, with the only difference being that after flashing, a sticker is not attached to them and a seal is not affixed;
— stitching must be done with a special thick stitching needle using an awl and stitching threads or twine. High-quality firmware requires reliable glue that will not lose its properties over a long period of time.
How to certify bound documents
After preparing, stitching and numbering the documents in the volume, gluing a special sticker, the stitching must be certified. The paper indicates the position, signature, full name. person responsible for stitching. A stamp is placed on top of the paper.
Who can certify the bound documents?
An already bound volume of documents can be certified by the company secretary, accountant, lawyer, head of the personnel department, clerk or any other official responsible for the documentation. Sometimes the stitching is certified by the owner of the enterprise or the director himself.
If documents are stitched incorrectly
If documents are stitched incorrectly, problems may arise for the organization and the employees responsible for stitching. The documentation may not be accepted for reporting to the tax office or another government organization. There is also a high probability that the required act, order or other type of important papers will get lost or will not be found in time.
Due to incorrect stitching, production itself may suffer. For example, inaccurate stitching can lead to a breakdown in cooperation or failure to conclude a profitable contract.
To restore the correct sequence of sheets, you will have to unravel the entire book and stitch it again. Then you will need to carry out all the same steps as when stitching the book for the first time. If everything is laced through the holes made with a hole punch, then it will be easier to remake the book.
Features of submitting documents to the archive
To submit documents to the archive, they must be properly stitched. After everything is done correctly, the volumes are arranged in accordance with the contents and in chronological order and taken away to the archive. At a large enterprise or government agency, a large room may be given to it. In small companies - just a cabinet or shelf.
In any case, only responsible persons have access to the document archive. To receive a document, make a photocopy or scan of it, the employee will need to find the required book in the presence of this person, and then perform the necessary actions. But usually the person in charge does everything himself, without resorting to outside help.
If the scan or photocopy turns out to be of poor quality, you will have to unlace the book. But this is not recommended, since some documents and attachments may be lost in the process.
Periods for storing documents in the archive
All bound documents, except for books prepared specifically for reporting to the tax office or other government bodies, are sent to the archive for storage. The length of time the documentation is there depends on the type of papers and is regulated by the legislation of the Russian Federation:
- 3 years – period for storing videos and photos;
- 5 years – storage time for archives of organizations related to agricultural activities, film and photography activities;
- 15 years – storage period for scientific documents, research, developments;
- 20 years – storage time for patents for inventions, documents on capital construction and design activities;
- 75 years is the storage period for notarial records, business books, all papers related to personnel, company activities, property, privatization.
All deadlines are specified in the Federal Law of October 22, 2004 N 125-FZ “On Archival Affairs in the Russian Federation.”
If at first stitching documents seems like a difficult task, with experience it all becomes simple, although it requires time, effort and care. The main thing is to study the rules, strictly follow them and maintain consistency. Responsibility in the event of incorrect stitching and loss of any of the papers lies with the clerk or person in charge of the archive.
How to stitch documents correctly
Having taken the documents out of the press, all that remains is to open the cover and mark the folding lines on the back side, which, turning back, will partially cover the tails of the threads. In order for this bend to hold better, it is not only coated with PVA glue, but also glued in the middle with tape, in addition to which a rectangular piece of paper with information about numbering and stitching will also be placed on the threads. On the side of such a book you can stick a piece of paper with the name: for example, “Sales Book for 2021.”
In any field of human activity where he has to deal with a large number of documents, one cannot do without their systematization. Some papers are sent to the archives, while others continue to be used in the work. Both are often subject to filing, but before we move on to this action, let's find out when it is appropriate.
We recommend reading: Is it possible to pay a settlement when dismissing an employee a day earlier?